Plans for an Information Philosophy Institute
Design and Building (August 6, 2018)
We collect all our thoughts in a single document so general contractors can understand the full scope of possible work.
But we divide the work into phases so a single contractor could take full responsibility for a given phase or project element (e.g., the new door and stair).
So far no general contractor has given us a firm estimate for taking on all or part of this project. And all though some specialists have shown interest in parts of the project, none has given us a budget and time estimate.
At this point, critical next steps are
-
the new heating system
-
new interior and outer wall framing and drywall
-
removable ceiling panels to access electrical circuits and low-voltage studio wiring
-
new front door/stair and remodeled back stair
-
remodel bathroom and new kitchenette
-
new guest rooms.
We will start to look for specialists to work on steps 2-6.
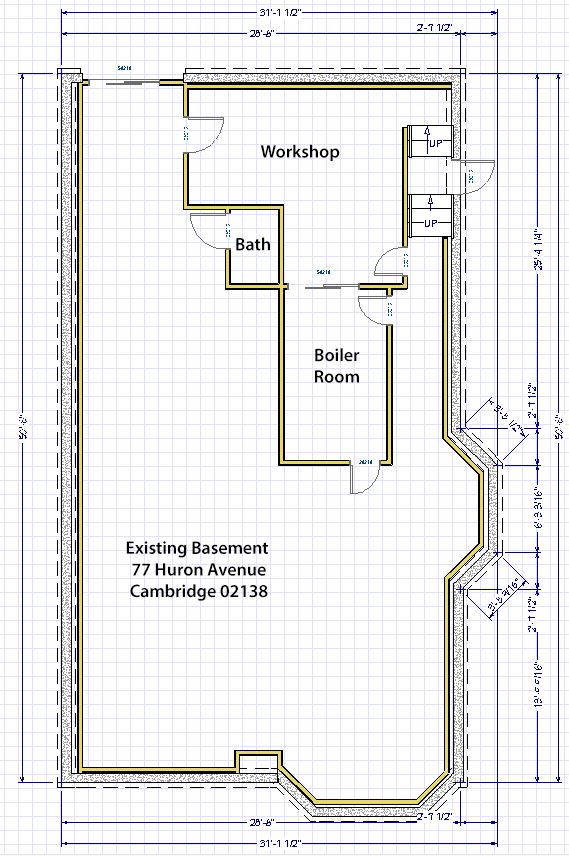
Phase 1, Demolition of Boilers-Pipes-Radiators, Ceilings, and Walls,
We decided to do the demolition phase ourselves to get a good look at any problems and we found significant damage hiding behind the walls and ceilings.
The basement had a horsehair plaster and lathe ceiling attached to floor joists, then a drop ceiling suspended a few inches below. The plaster had been pierced to install fluorescent lighting up between the joists. Plaster was crumbling and falling down in many places, making the basement dusty and dirty.
Steam pipes were too low for normal headroom. We decided to switch from steam heat to forced hot water.
Electrical wires, thirty Merlin PBX wires, doorbell wiring, and many other wires criss-crossed the cellar, lying on the ceiling tiles and randomly breaking through the plaster, which was constantly disintegrating into dust.
The oldest electrical wires were deteriorating cloth-insulated inside ancient BX metal armor.
Low-voltage electronics cables from our webcasting studio to the switcher and green room were very difficult to manage.
To get a clear look at floor joists and first-floor planking, we decided to remove the drop ceiling and demolish the plaster and drop ceilings. The drop ceiling averaged about 4" below the joists, reducing ceiling height below seven feet.
With all joists exposed, we did a survey of ceiling heights. In the front corners the height to the joists is 7'4" and averaged 7'3" across the space toward the outer walls. The main beams in the center are typically 7'1". We thought we might have to dig out the concrete floors, but that is now not necessary.
We plan to install 1/2" ceilings, removable plywood panels, and thin vinyl sheet flooring, so will have the Massachusetts state building code basement ceiling height everywhere. See code below.
We found water and termite damage to the back ends of main beams and several joists below the upper-floor bathrooms. Plumbers had cut deeply into the joists to position the bathtub drains and upper floors were sagging below level.
We consulted a structural engineer whose report said that weak joists should be sistered with new 2" x 8" wood. For the weak beams, 2" x 10" LVL lumber on either side of the 6" x 10" beams, or three new 2" x 10" LVL lumber to replace bad beams, through-bolted every 1.5 feet with 1/2" x 10" bolts.
We lifted sagging joists with hydraulic jacks before sistering the joists. They are all now at or above their original 7' height.
Under the main beams we will more closely placed jack posts to be hidden in new wall partitions. Original columns were on 6' centers. New Tiger J-Pro-100 10-ton jack posts are on 2' centers between old columns. Support is now many times better than the original.
There was no blocking between the joists, so at many places floorboards were spongy and noisy, pulled loose from the sub-floor.
We removed all of the BX and any obsolete wires, many of which were wrapped over and under pipes and haphazardly stapled to beams and joists with non-insulated staples. We reorganized locations for wires, attaching them neatly with insulated staples. Wires now run only down the long corridor between the main beams, then out between the joists.
This also provides us clear open paths for PEX-A piping between the main load beams and up between the floor joists for a new forced hot water heating system in phase 2.
We removed two inefficient steam boilers and all piping and radiators on the three upper floors.
We have finished removing the sheetrock outer walls, studs, etc. Some studs and many 2" x 4" bottom plates were badly rotted.
We demolished the existing interior walls that must be moved to new places for the new boiler room, larger bathroom, and for the new workshop wall.
We removed the old vinyl floor tiles in preparation for new continuous vinyl flooring. The concrete floor is uneven by as much as an inch, but we probably will just accept that variation.
We repointed the lower half of exterior walls (rubble foundation) with new mortar.
We demolished the walls and ceiling of the first floor bathroom, partly to run new drain pipes that do not compromise our new joists, an because we want to install a walk-in shower.
We got an extravagant estimate for sistering ten joists, replacing 20 feet of each main beam, and adding two new columns with new reinforced concrete footings. We went ahead and sistered the six worst joists and are working on sistering or replacing weak parts of the main beams. The floors above are now much stronger.
A new forced hot water heating system will be installed in about half the space of the old boiler room.
Gas entrance pipes need to be relocated up between the now-open joists, and boxed along the exterior wall.
Fire retardant walls and ceiling for the boiler room? Maybe not, because new boilers have sealed combustion chambers with no open flames.
System should have zone control for the three upper floors and for future basement and garage heating.
About 17 new European style, white wall-mounted radiators will be installed on the upper three floors.
Wirsbo/Uponor AquaPEX (PEX-A) piping will mostly follow the existing holes for the old steam radiators. We hope to hide most piping inside partitions.
Replace the hot water heater with an indirect tank with heat exchanger in the boiler.
Manifolds needed
-
5-loop master manifolds (supply and return) in boiler room with programmable flow actuators. (Size? 1 in. input, 3/4 out?)
-
Three 5-loop manifolds (e.g., 3/4 in, 1/2 out?), one for each floor, mounted above corridor between main beams with flow restrictions and home runs to radiators. Front/middle bedrooms, and rear bedroom/bath share a home run. Large front rooms have two. Kitchen has one.
-
Thermostatic valves on all radiators to balance room temperatures beyond flow restrictions?
Phase 2a, Sump Pumps to Prevent Flooding
Although the cellar has been mostly dry since we redirected rain from our adjacent garages, we will install two sump pumps at the front left and right corners of the basement, with PVC pipe sending the water to our driveway, just as our neighbors at 81 Huron have done for years.
We will also add new drain pipes on porches at front and rear to keep water away from the house foundation.
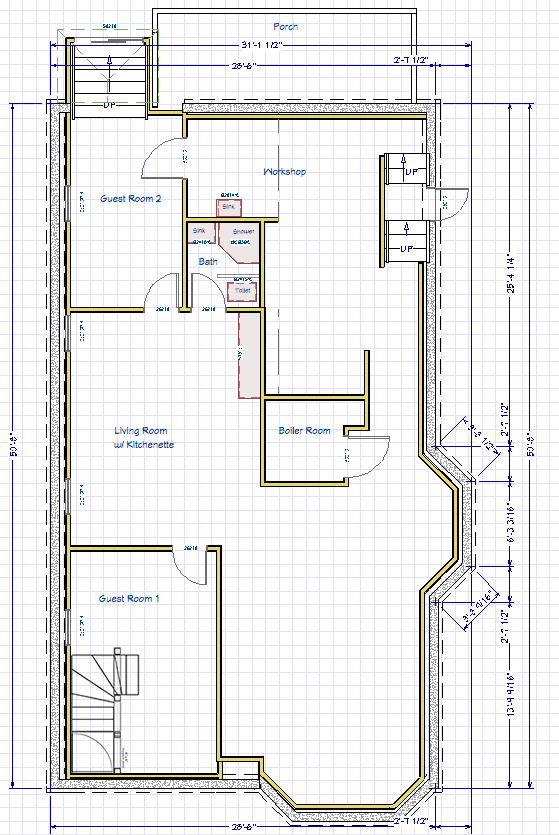
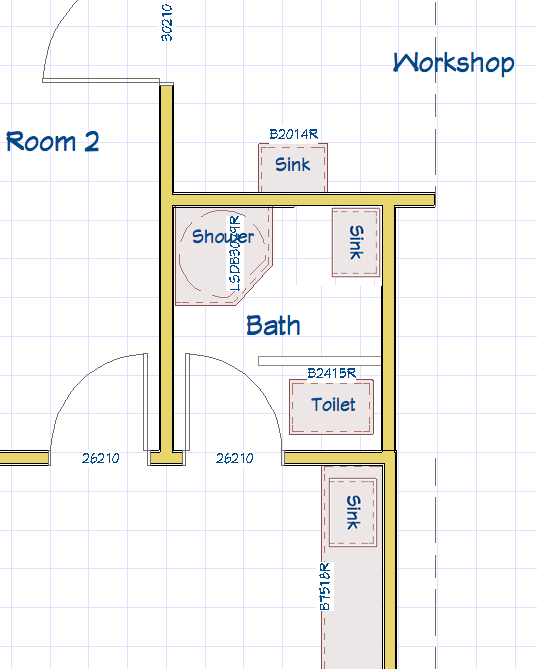
Phase 3, New Front and Renovated Rear Entrances, Renovate Bathroom, Add Kitchenette
- New door and stair at front of the basement, opening on the driveway, to provide another safe egress. Structural engineer is needed to approve framing to support the existing staircase above.
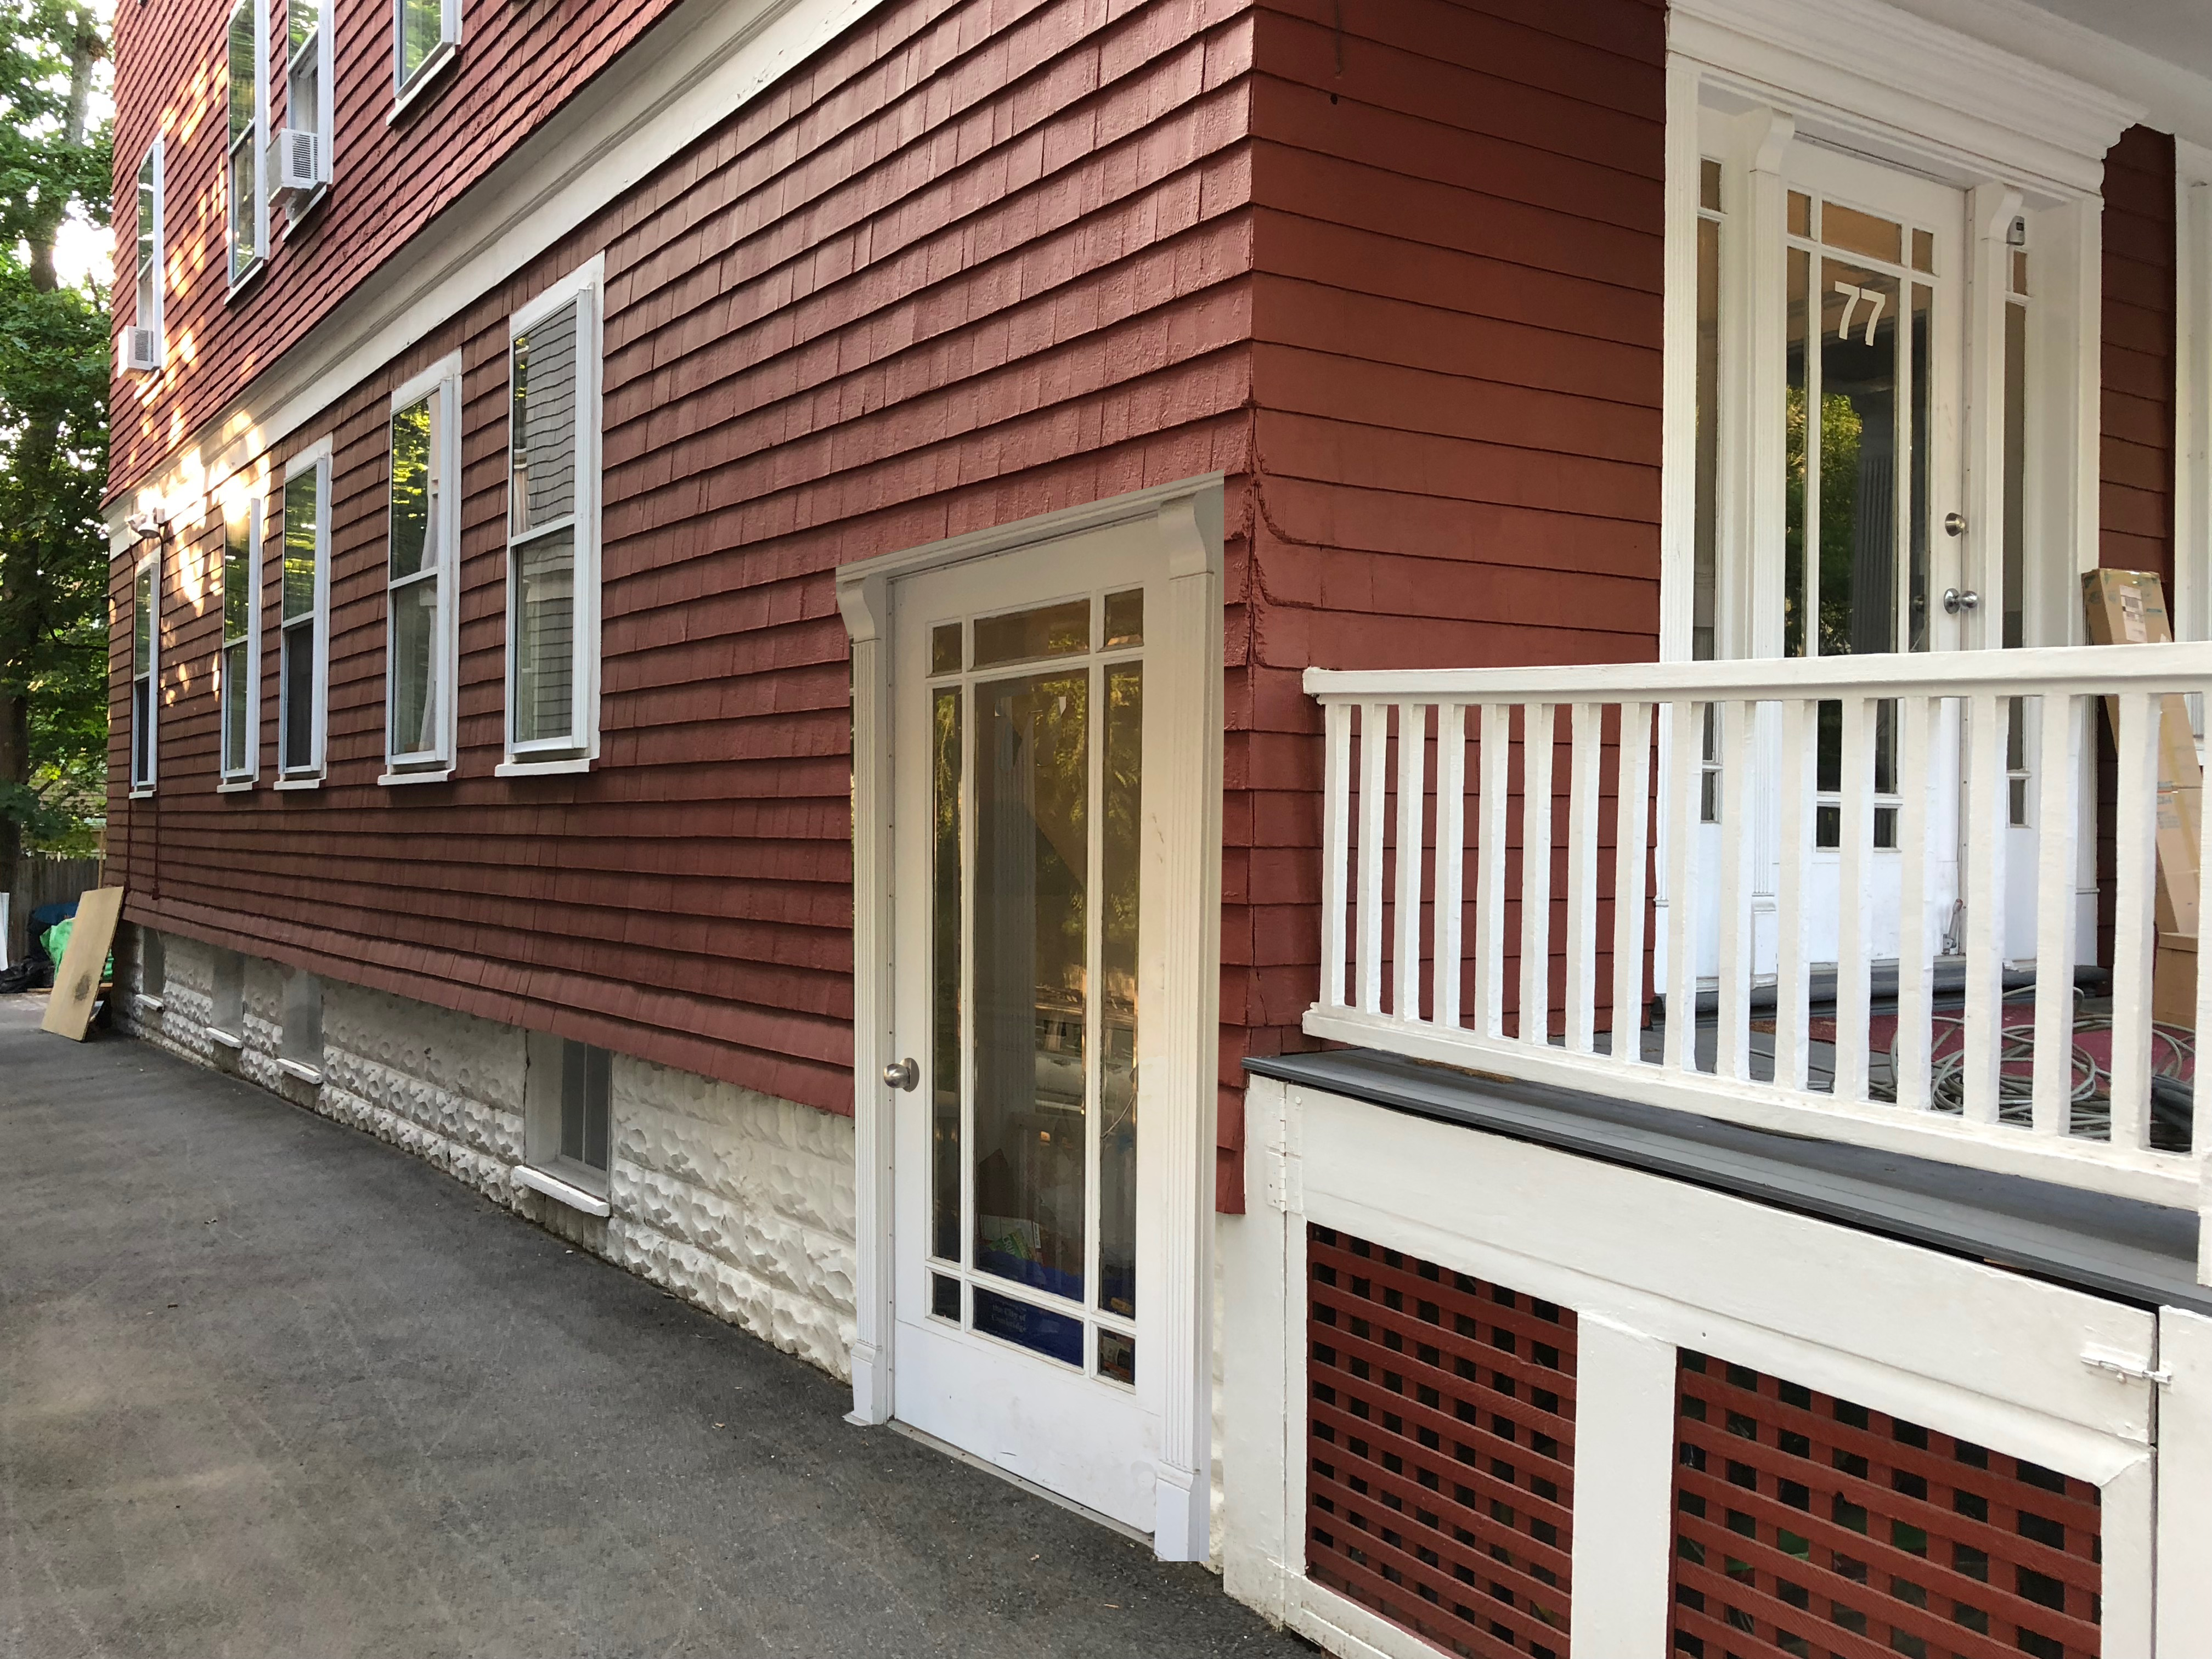 Visualization of new side entrance
- Replace 6-foot sliding door at rear with a standard 80" door at the head of the stair (will need to remove concrete steps, replace with wood). We will house the new stairs inside the basement, surrounded by new exterior walls and roof, replacing existing open roof.
-
New double-pane casement hopper windows, with screens.
-
Renovate the existing half-bath to include a walk-in shower.
-
Leave existing Lally columns in the bathroom and workshop. Enclose one in a partition between shower and toilet. Add jack posts in bathroom and workshop walls to provide additional support for main beams.
-
Move existing workshop wall back to line up with bathroom, move the workshop sink.
-
Add a new kitchen sink and counter for kitchenette along the workshop wall. Space for microwave, convection oven, and small refrigerator.
-
Remove one Lally column that obstructs the kitchen counter. Add two new 4" steel tube columns .220" wall with new footings and 10" x 10" top plate supporting five 2" x 10" x 12' LVL planks through-bolted with 1/2" x 10" hex bolts.
Phase 3a, Renovate Two Upper Floor Bathrooms
New walk-in showers, replace leaking pipes on floors 1 and 3.
Add sister joists to strengthen those badly cut away for cast iron pipe access below first floor bath. Thread new PVC piping through holes, not notches, in the new sistered joists, or perhaps in the first floor bathroom wall.
We demolished the walls and ceiling of the first floor bathroom and will build a new stud wall at 60" separation to accept a new walk-in shower..
Phase 4, New Ceiling, Outer Walls, Renovate Bath, and Partitions for Two Guest Rooms in Basement
-
R-19 insulation between floor joists for sound isolation.
-
Removable ceiling panels, many with recessed LED lighting fixtures with integrated junction boxes. Three-way switches both for recessed downlights and "fluorescent" LED tube worklights.
-
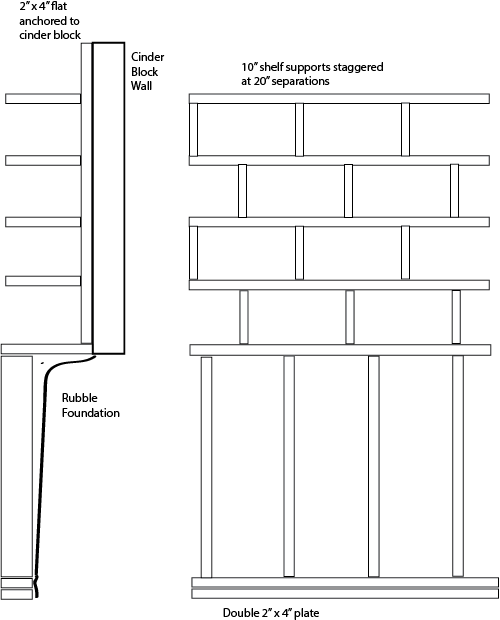
Upper four feet of exterior walls will have built-in bookshelves with alternating verticals "bookworm" style. We will design and build a four-foot section of the exterior wall as a model.
-
Thin rigid insulation or spray foam on cement-block wall behind bookshelves
-
R-13 insulation behind lower half of exterior walls against the rubble foundation
-
R-13 insulation in interior partition walls to block sound
-
Electric outlets in partitions
-
Small air conditioners in guest rooms through the cement blocks? (can now be located under porches?)
-
Radiator pipes (PEX-A) in partitions
-
Proposed bedrooms have been moved to include the two entrance stairs/doors for emergency egress. The LR/kitchenette and bath are now in the middle.
-
New vinyl sheet flooring in basement, perhaps different designs in different rooms?
-
Two sump pumps at the front are needed to eliminate future floods? The one at left front should pipe over to that at the right, which should pump out to the common driveway, as our neighbor at 81 Huron now does.
-
New downspouts at the front and rear of the house should be installed to better direct water away from the basement.
-
Once all floor joists are strong, we will need a new subfloor and hardwood or laminate flooring in the first floor corridor, with blocking/bridging between floor joists as needed to prevent squeaking.
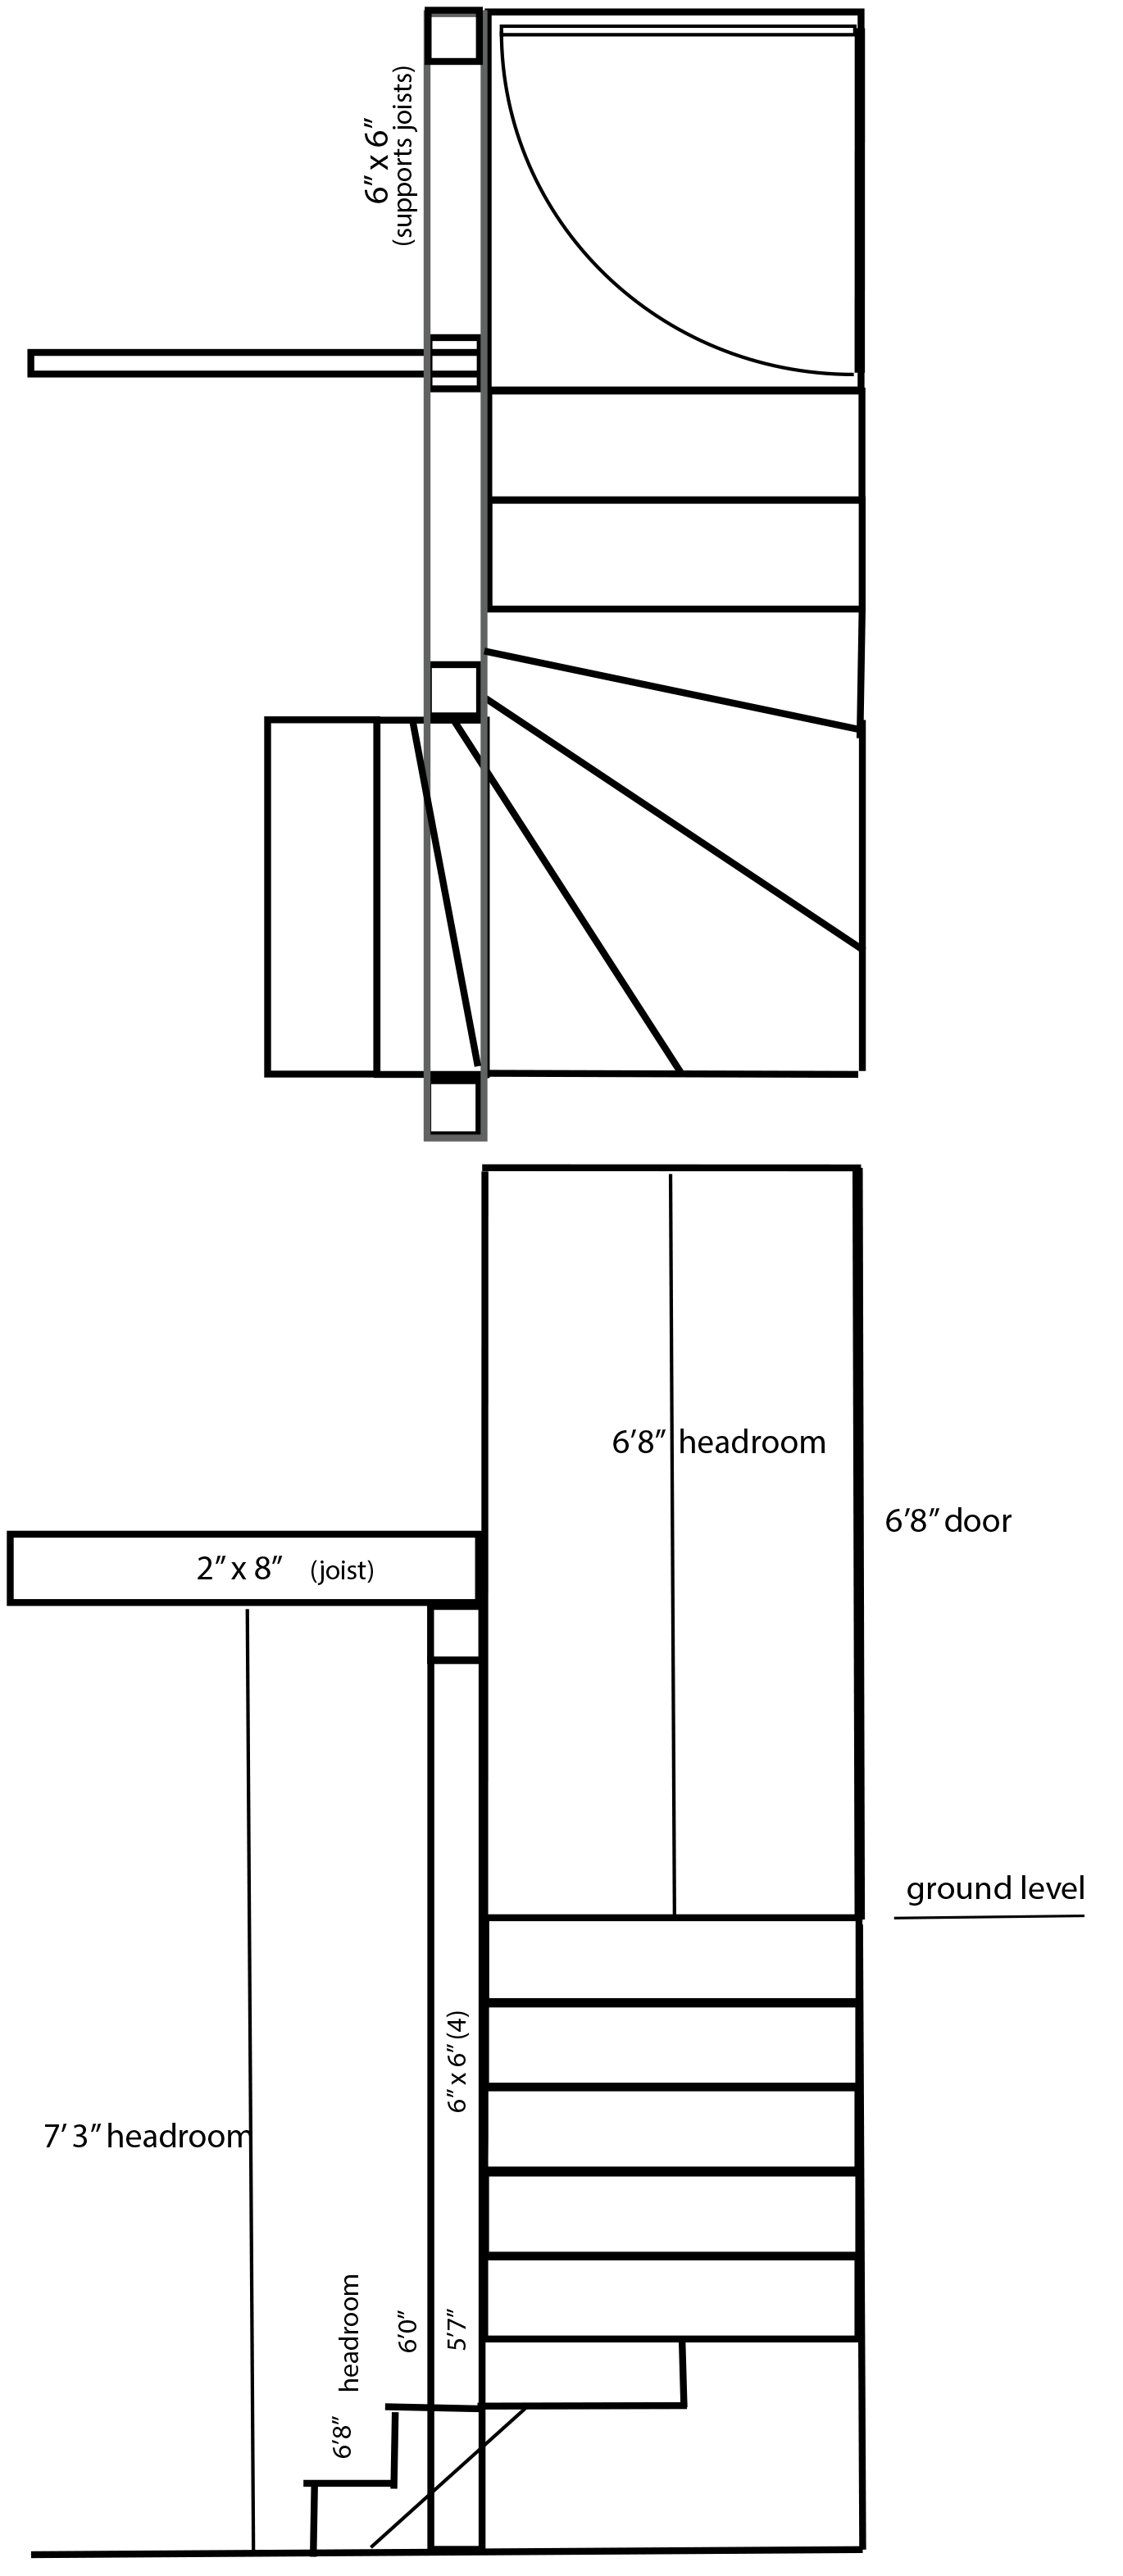
Phase 4a. Front Stair Design
The front stair follows the same arrangement of treads as the stairs above to maximize headroom.
Since the basement ceiling height is 7'3" at the new stair, compared to upper floors with nine feet, the headroom may be below code, depending on access to the under stair space above. It is lowest at the winder corner, 5'7".
While upper floor winder stairs have zero tread width at the corner, this design maintains average tread width of 10" along the center line of travel per modern code.
Headroom is reduced at that corner by the new beam holding up the crippled joists. Could we push that beam farther away from the outer wall to get the necessary headroom? We need to inspect the space under the first flight of stairs above. Maybe headroom will be over 6'.
Phase 4b. Renovate Basement Bathroom
Enlarge bath from 7' x 3.5' to 7' x 5'6".
Existing plumbing works well for toilet and sink.
Probably need to excavate part of bathroom floor to provide a P-trap for a new shower drain. Also will need a sump pump to force shower water up into adjacent sink drain? An "ejector" pump is not needed because shower drain has no solid waste.
Cambridge Zoning Standards and 77 Huron Avenue
Our property is non-conforming with multiple zoning standards from
ZONING ORDINANCE - CITY OF CAMBRIDGE
ARTICLE 5.000 DEVELOPMENT STANDARDS,
5.31 Residential Districts
|
District
|
1. Max. Ratio of Floor Area to Lot Area (FAR)
|
2. Min. Lot Size
|
Min. Lot Area for each D.U. in Sq. Ft.
|
Min. Lot Width in Feet
|
Minimum Yard in Feet
|
Front
|
Side
|
Rear
|
|
Max. Height in Feet
|
Min. Ratio of Private Op. Sp. to Lot Area
|
|
Res. B
|
0.5
|
5,000
|
2,500
|
50
|
|
35
|
40%
|
|
77 Huron
|
1.16
|
3745
|
3745/3 = 1248
|
40
|
|
35
|
53%
|
Excerpt from Cambridge Property Database for 77 Huron Avenue
Property Value
| Year of Assessment | 2018 |
|---|
| Tax District | R6 |
|---|
| Residential Exemption | Yes |
|---|
| Building Value | $799,800 |
|---|
| Land Value | $845,300 |
|---|
| Assessed Value | $1,645,100 |
|---|
| Sale Price | $42,500 |
|---|
| Book/Page | 12493/ 731 |
|---|
| Sale Date | August 3, 1973 |
|---|
| Previous Assessed Value | $1,604,400 |
|---|
Owner Information
| Owner(s) | DOYLE, ROBERT D. &
HOLLY THOMIS DOYLE
77 HURON AVE
CAMBRIDGE, MA 02138-6798 |
|---|
Building Information
Residential Building Number 1, Section 1
Exterior
| Style | DECKER |
|---|
| Occupancy |
THREE-FM-RES |
| Number of Stories | 3 |
|---|
| Exterior Wall Type |
Wood Shingle |
| Roof Type |
Flat |
| Roof Material |
Rubber Membrane |
Interior
| Living Area (sq. ft.) | 4,362 |
|---|
| Number of Units |
3 |
| Total Rooms |
18 |
| Bedrooms |
9 |
| Kitchens |
3 |
| Full Baths |
3 |
| Half Baths |
1 |
| Fireplaces |
0 |
Systems
| Heat Type | Steam |
|---|
| Heat Fuel |
Gas |
| Central A/C |
No |
Condition & Grade
| Year Built | 1916 |
|---|
| Interior Condition |
Average |
| Overall Condition | Average |
|---|
| Overall Grade | Good |
|---|
Parking
| Open Parking | 2 |
|---|
| Covered Parking | 0 |
|---|
Subareas
| Code |
Description |
Gross Area |
Living Area |
| FOP |
Porch, Open |
651 |
0 |
| FUS |
Upper Story, Finished |
2,908 |
2,908 |
| BAS |
First Floor |
1,454 |
1,454 |
| FBM |
Basement, Finished |
700 |
0 |
| UBM |
Basement |
754 |
0 |
| Total: |
6,467 |
4,362 |
Ceiling Height - Code of Massachusetts Regulations
CMR: STATE BOARD OF BUILDING REGULATIONS AND STANDARDS
780 CMR 5305 CEILING HEIGHT 5305.1 Minimum Height. Habitable rooms, hallways, corridors, bathrooms, toilet rooms, laundry rooms and basements shall have a ceiling height of not less than seven feet (2134 mm). The required height shall be measured from the finish floor to the lowest projection from the ceiling.
Exceptions:
1. Beams and girders spaced not less than four feet (1219 mm) on center may project not more than six inches (152 mm) below the required ceiling height.
2. Ceilings in basements without habitable spaces may project to within six feet, eight inches (2032 mm) of the finished floor; and beams, girders, ducts or other obstructions may project to within six feet, four inches (1931 mm) of the finished floor.
3. Not more than 50% of the required floor area of a room or space is permitted to have a sloped ceiling less than seven feet (2134 mm) in height with no portion of the required floor area less than five feet (1524 mm) in height.
4. Bathrooms shall have a minimum ceiling height of six feet eight inches (2036 mm) over the fixture and at the front clearance area for fixtures. A shower or tub equipped with a showerhead shall have a minimum ceiling height of six feet eight inches (2036 mm) above a minimum area 30 inches (762 mm) by 30 inches (762 mm) at the showerhead.
5. Ceiling heights in habitable basements, including drop ceilings, shall be a minimum of six feet eight inches (2032 mm).
References
This Old House
Stair Construction