Plans for an Information Philosophy Institute
Design and Building (June 29, 2019)
Please see a summary of events in early 2018 that led to these plans.
We collected all our thoughts in a single document so a general contractor can understand the full scope of possible work.
But we divided the work into sub-projects so a single contractor could take full responsibility for a project element (e.g., the new door and stair, foundation waterproofing, solar panels, or tunnel to garage).
We are working with a general contractor who took on most of the work, and with an HVAC specialist who installed mini-split air conditioning for the lab and studio on the first floor, and who installed a new highly-efficient forced hot water heating system for the building.
We have updated the late 2018 version of this document with important changes in square brackets.
At this point, important project elements are
Demolition of Boilers-Pipes-Radiators, Ceilings, Walls, Obsolete Wiring,
We decided to do the demolition ourselves to get a good look at any problems and we found significant damage hiding behind the walls and ceilings.
The basement had a horsehair plaster and lathe ceiling attached to floor joists, then a drop ceiling suspended a few inches below. The plaster had been pierced to install fluorescent lighting up between the joists. Plaster was crumbling and falling down in many places, making the basement dusty and dirty.
To get a clear look at floor joists and first-floor planking, we decided to remove the drop ceiling and demolish the plaster and drop ceilings. The drop ceiling averaged about 4" below the joists, reducing ceiling height below seven feet.
Steam pipes were too low for the headroom required by Massachusetts and Cambridge building codes. We decided to switch from steam heat to forced hot water. We removed and recycled two inefficient steam boilers, seventeen very heavy upstair radiators, and many feet of heavy black pipe. These have been be replaced with panel radiators and light-weight PEX piping, which are hidden inside the walls in some places.
Electrical wires, thirty Merlin PBX wires, doorbell wiring, security camera wiring, and many other wires criss-crossed the cellar, lying on the ceiling tiles and randomly breaking through the plaster, which was constantly disintegrating into dust.
The oldest electrical wires were deteriorating cloth-insulated inside ancient BX metal armor.
Low-voltage electronics cables from our webcasting studio to the switcher and green room were very difficult to manage.
We removed all of the BX and several obsolete wires, many of which were wrapped over and under pipes and haphazardly stapled to beams and joists with non-insulated staples. All horizontal BX was replaced with Romex. We reorganized locations for wires, attaching them neatly with insulated staples. Wires now run mostly down the long corridor between the main beams, then out between the joists. The iTV-Studio wiring and some Romex run above a drop-down "raceway" door that gives us access to all wiring for maintenance.
PEX piping runs between the main load beams and up between the floor joists for the new forced hot water heating system.
With all joists exposed, we did a survey of ceiling heights. In the front corners the height to the joists is 7'4" and averaged 7'3" across the space toward the outer walls. The main beams in the center are typically 7'1". We initially thought we might have to dig out the concrete floors, but that very expensive possibility is now not necessary.
We plan to install 1/2" ceilings, removable plywood panels, and perhaps thin vinyl sheet flooring or ceramic planking, so will have the Massachusetts state building code basement ceiling height everywhere. See code below. [We used removable ceiling panels only between the main beams in the library/screening room, the kitchenette, and the bathroom.]
There was no blocking between the joists, so at many places floorboards were spongy and noisy, pulled loose from the sub-floor.
We removed the sheetrock outer walls, studs, etc. Some studs and many 2" x 4" bottom plates were badly rotted.
We demolished the existing interior walls that must be moved to new places for the new boiler room, a larger bathroom, and for the new workshop wall.
We removed the old vinyl floor tiles in preparation for new flooring. The concrete floor is uneven by as much as an inch, so we probably must flatten it (though not level it) for new flooring. [We rented a concrete grinder from Home Depot and smoothed five critical areas. Ace Flooring used a polymerized concrete to smooth the floor before installing vinyl planks with a wood pattern.]
We demolished the walls and ceiling of the first floor bathroom, partly to run new drain pipes that do not compromise our new sistered joists, and because we want to install a walk-in shower. [Foster and Sons removed the main plumbing stack in the cellar, which was severely clogged.]
Sistering Joists, Replacing Parts of Main Beams, and new Lally Columns
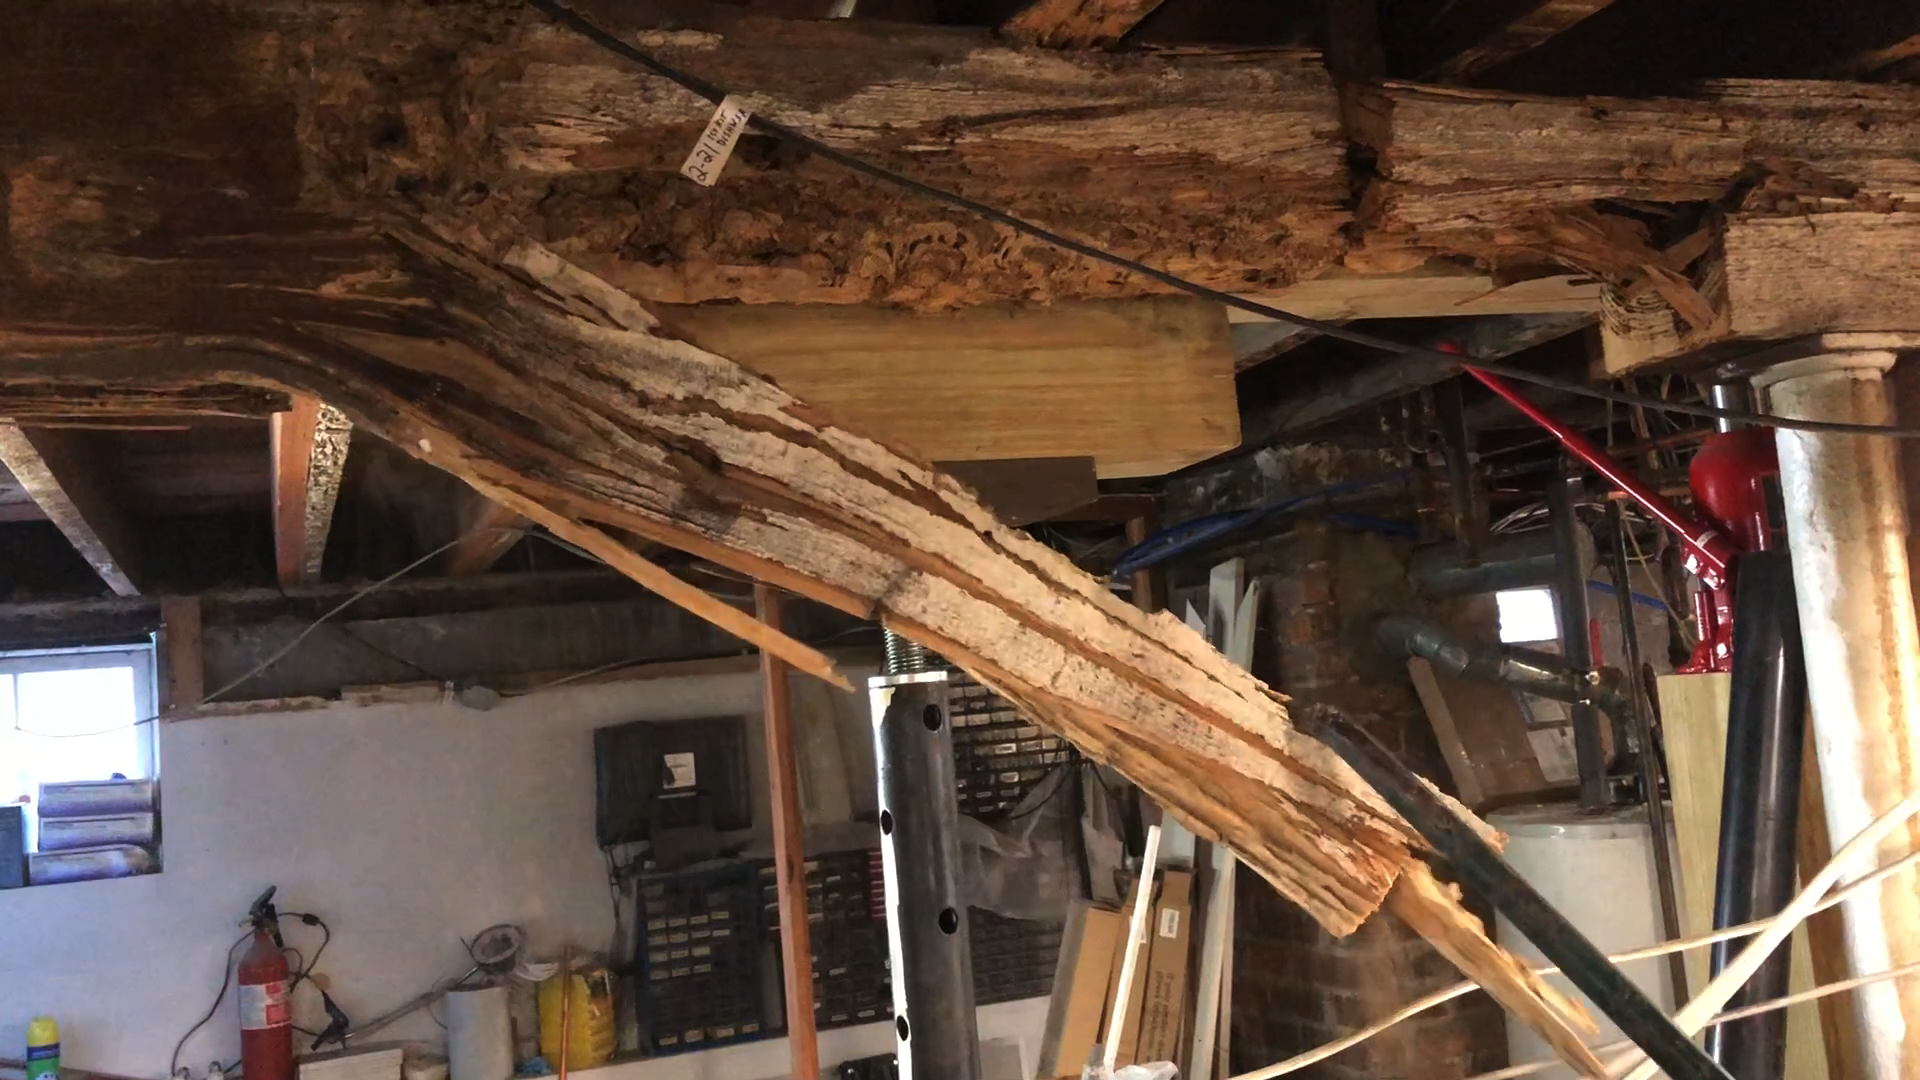
We found water and termite damage to the back ends of main beams and several joists below the upper-floor bathrooms. Plumbers had cut deeply into the joists to position the bathtub drains and upper floors were sagging well below their original level.
We consulted a structural engineer whose report said that weak joists should be sistered with new 2" x 8" LVL planks. For the termite-damaged main beams, he recommended removing them and installing three new 2" x 10" LVL boards to replace the bad beams.
We got an extravagant estimate ($69,000) for sistering ten joists, replacing 20 feet of each main beam, and adding two new columns with new reinforced concrete footings. We got a lower estimate for just sistering the joists ($10,000), but still very expensive.
So we went ahead and sistered the dozen worst joists ourselves with new 2" x 8" LVL planks. We also strengthened the "cripple box" around the new plumbing stack.
We used six 20-ton hydraulic jacks to shore up the joists, taking weight off the beams, so we could remove the damaged sections in small pieces. Long sections of the main beam, eaten by termites, were easily pulled down with a crowbar and disintegrated into toothpicks. It is amazing the house did not collapse.
 We replaced the damaged 20 feet of each 6" x 10" beam with three 2" x 10" LVL planks, each pair screwed together with Headlok 2 3/4" screws and glued with Liquid Nails Extreme. The three planks are bolted together with 1/2" bolts every 1.5 feet.
The three LVL planks together are about five times stronger than the original 6" x 10" beam they replace, ensuring that the building is stronger now than when built.
Under the main beams we replaced three Lally columns that were deteriorating. We relocated three columns to be hidden in bathroom wall partitions, setting them on new concrete footings with reinforcing rebars.
We replaced the damaged 20 feet of each 6" x 10" beam with three 2" x 10" LVL planks, each pair screwed together with Headlok 2 3/4" screws and glued with Liquid Nails Extreme. The three planks are bolted together with 1/2" bolts every 1.5 feet.
The three LVL planks together are about five times stronger than the original 6" x 10" beam they replace, ensuring that the building is stronger now than when built.
Under the main beams we replaced three Lally columns that were deteriorating. We relocated three columns to be hidden in bathroom wall partitions, setting them on new concrete footings with reinforcing rebars.
 We then called the structural engineer in to see the work. He generally approved, but wanted the three moved Lally columns to have larger footings and thought the new nine-foot span created by moving one Lally column into the bathroom wall might need another 2" x 10" LVL plank.
We then hired a second professional engineer to draw up the plans describing these changes for submission with our request for a building permit.
A new forced hot water heating system was installed in about half the space of the old boiler room.
We then called the structural engineer in to see the work. He generally approved, but wanted the three moved Lally columns to have larger footings and thought the new nine-foot span created by moving one Lally column into the bathroom wall might need another 2" x 10" LVL plank.
We then hired a second professional engineer to draw up the plans describing these changes for submission with our request for a building permit.
A new forced hot water heating system was installed in about half the space of the old boiler room.
 Gas entrance pipes were relocated up between the now-open joists, and will be boxed along the exterior wall.
Fire retardant walls and ceiling for the boiler room? Maybe not, because new boilers have sealed combustion chambers with no open flames.
System has independent zone control for the three upper floors and for future basement and garage heating.
Twenty-one new European style, white wall-mounted radiators are being installed on the upper three floors.
Wirsbo/Uponor hePEX (PEX-A) piping mostly follows the existing holes for the old steam radiators. Pipes will travel from the new boiler room along the corridor between the main beams, then out between floor joists to the rooms.
Most piping is hidden above the ceiling between joists and down inside wall partitions.
The old GE hot water heater is replaced with a "Featherweight" indirect tank with heat exchanger in the boiler.
Gas entrance pipes were relocated up between the now-open joists, and will be boxed along the exterior wall.
Fire retardant walls and ceiling for the boiler room? Maybe not, because new boilers have sealed combustion chambers with no open flames.
System has independent zone control for the three upper floors and for future basement and garage heating.
Twenty-one new European style, white wall-mounted radiators are being installed on the upper three floors.
Wirsbo/Uponor hePEX (PEX-A) piping mostly follows the existing holes for the old steam radiators. Pipes will travel from the new boiler room along the corridor between the main beams, then out between floor joists to the rooms.
Most piping is hidden above the ceiling between joists and down inside wall partitions.
The old GE hot water heater is replaced with a "Featherweight" indirect tank with heat exchanger in the boiler.
 Manifolds needed
-
A 5-zone master manifold in boiler room with variable delta-T circulators. (1.5" input, 1" out to zone manifolds)
-
Three 7-loop Uponor EP manifolds (1" in, 1/2" out), one for each floor/zone, with isolating and balancing valves, flow meters, and home runs to radiators.
-
A few radiators have thermostatic valves to balance room temperatures.
Details on our heating plans.
Mini-split air conditioning for the first floor lab, webcasting studio, and guest room.
Since we removed all the ceilings in the cellar, we can also send refrigerant lines from the outside compressor/condenser to the wall-mounted units inside by traveling between the main cellar beams and between the joists to the outside walls.
Fujitsu components
-
AOU45RLXFZ multi-zone outdoor unit, installed on the concrete sidewalk outside the northeast wall
- Two ASU12RLF1 wall mounts in the main studio, whose temperature rises 20 degrees when the studio is operating. One at the front door, the other at the back of the room, near the heavy equipment in the hutch.
- One ASU12RLF1 in the green room.
- One ASU12RLF1 in the front and middle offices, which are openly connected.
- One ASU7RLF1 in the rear office/guest room
We installed a new 30A circuit and circuit breaker for the outdoor unit.
Foundation Waterproofing and Possibly Sump Pumps to Prevent Flooding
With all the exterior walls now visible, we ran water through a garden hose around the house perimeter and saw water coming through the rubble foundation in some places. We may need to dig outside and waterproof the foundation walls from the outside. As additional protection, we may add one or perhaps two sump pumps at the front to eliminate future floods? Although we will test the outside waterproofing first. [The foundation walls were all repointed with new mortar, especially along the concrete floor, and all leaks were eliminated. The walls remained dry during the heaviest rainstorms.]
Keller Waterproofing excavated garage walls down below the foundation slab and applied a waterproofing rubber membrane. The also installed three sump pumps.
We still plan to add new downspouts on porches at front and rear to keep water away from the house foundation.
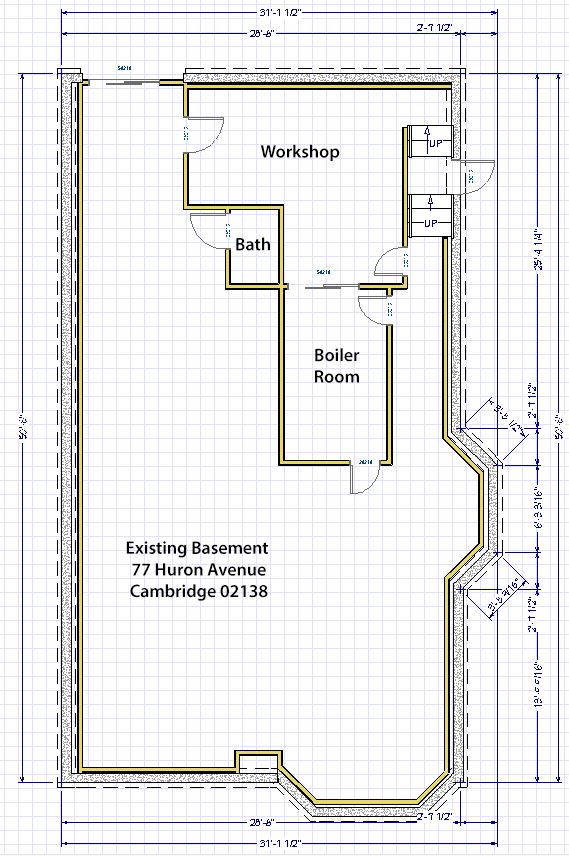
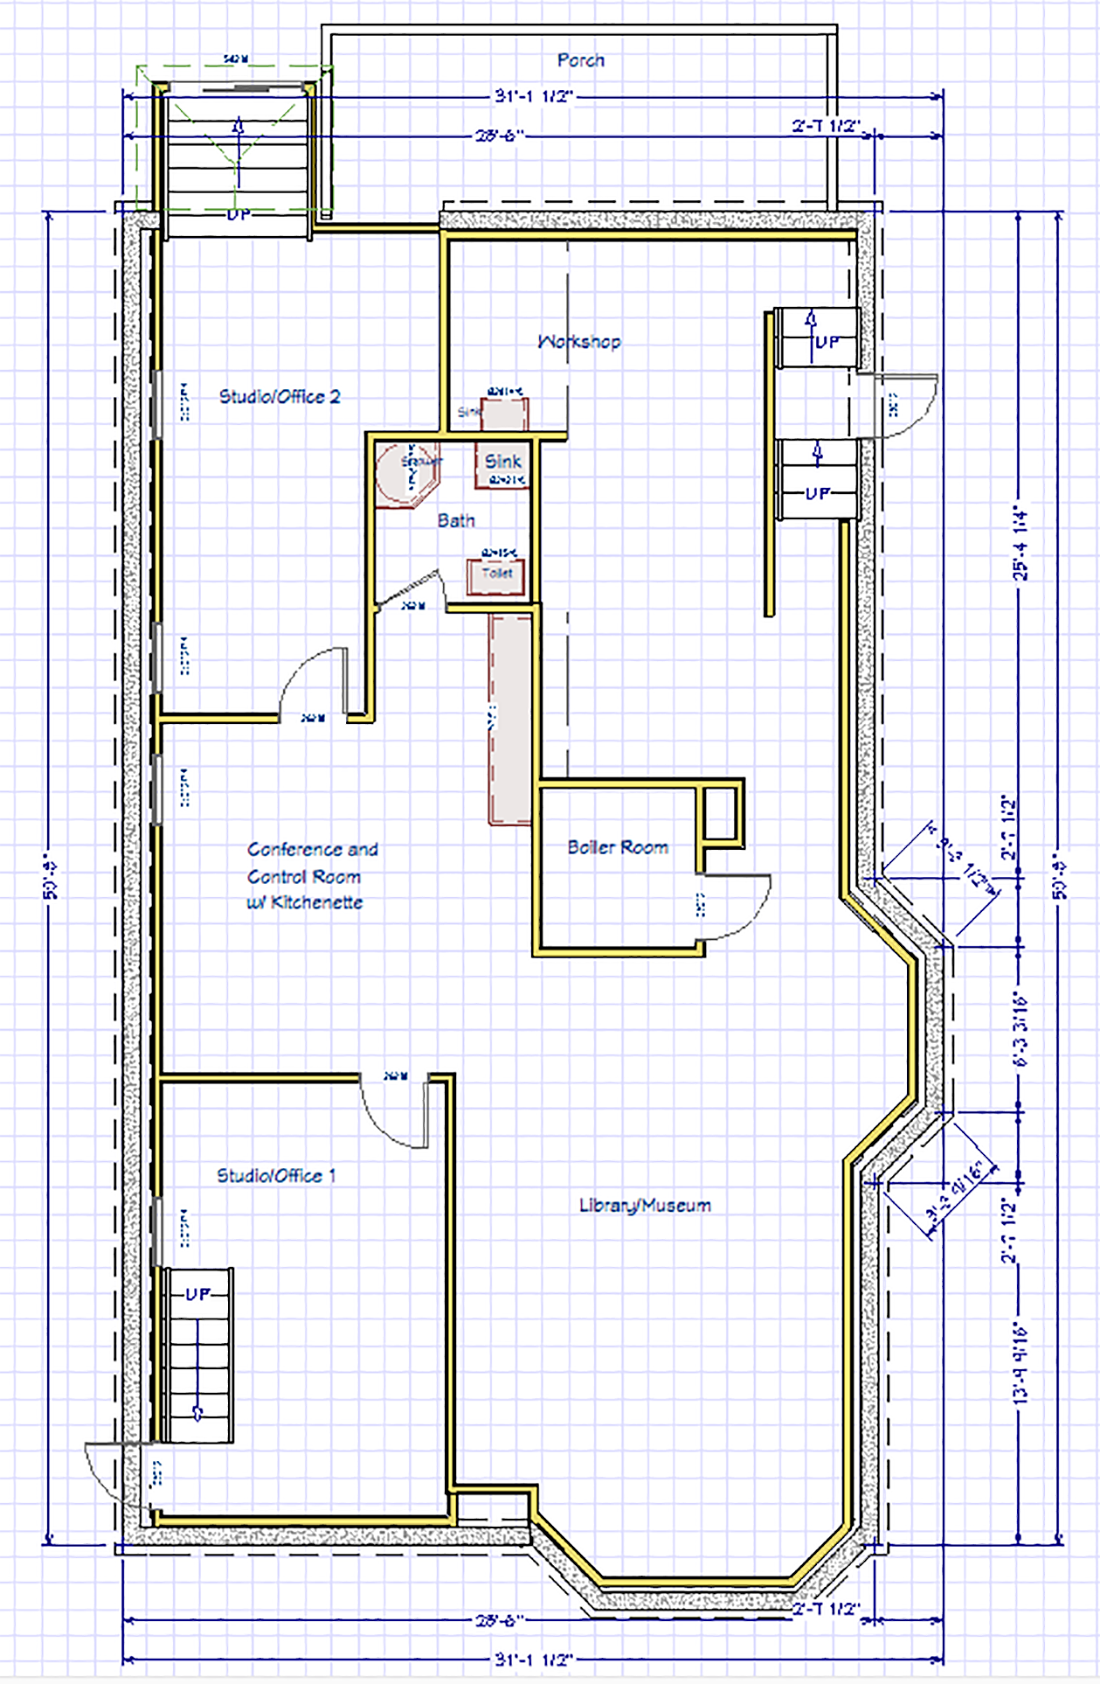
Major Basement Changes
- New door and stair at front of the basement, opening on the driveway, to provide another safe egress. Upper stairs are supported entirely by the adjacent walls
- Replace 6-foot sliding door at rear with a 6 foot wide standard 80" door at the head of the stair (we will need to remove concrete steps, replace with wood). We hope to house the new stairs inside the basement, surrounded by new exterior walls and roof, replacing existing open roof.
-
New double-pane casement sliding windows, with screens, were installed.
-
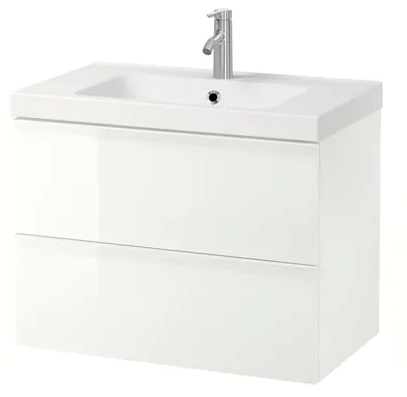
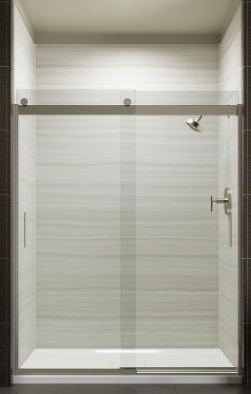
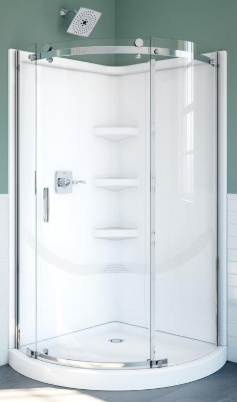
The existing half-bath was renovated to include a walk-in shower.
-
We moved two Lally columns to hide them in the bathroom walls.
-
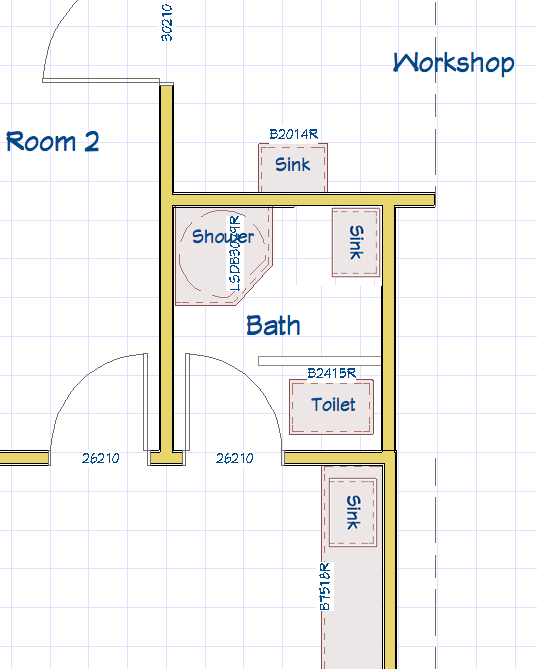
We moved the existing workshop wall back to line up with bathroom and moved the workshop sink.
-
We added a new kitchen sink and counter for the kitchenette on the other side of the workshop wall. It has space for microwave, convection oven. The existing refrigerator has a separate alcove.
-
We removed one Lally column that obstructs the kitchen counter. Add two new 3.5" steel tube columns, .220" wall with new footings and 6" x 6" top plate supporting the three 2" x 10" x 12' LVL planks.
-
Basement floor covering was vinyl tile. We replace it with vinyl planks.
 Download PNG
Renovate First Floor Bathroom for the iTV-Studio and Guest Room
We demolished the walls and ceiling of the first floor bathroom and built a new interior wall at 60" separation to accept a new walk-in shower.
We added sister joists below the first-floor bathroom to strengthen those badly cut away for cast iron drain pipe access below first floor bath. New PVC piping was run below, not through holes in the joists.
Fixtures for first floor bathroom.
We cut a rectangular notch in the 0.2" shower wall material to allow us to keep the window. 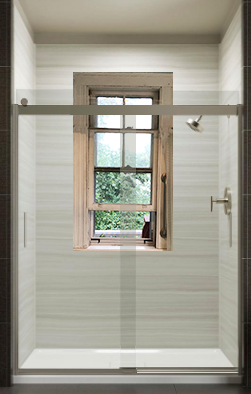
New Outer Walls, Ceilings, and Partitions for Two Offices for Visitors in Basement
-
R-19 insulation between floor joists for sound isolation and fireproofing. For example, Owens Corning EcoTouch PINK.
It was mounted to the floor above so we could run future low-voltage studio wiring, doorbell wiring, new electric circuits, mini-split air conditioning lines, and others not yet known.
-
Removable ceiling panels [between main beams only], many with recessed LED lighting fixtures with integrated junction boxes. Three-way switches for recessed downlights. Single switches for "fluorescent-style" LED tube worklights and illumination of the "museum" shelves.
-
Upper four feet of exterior walls will have built-in bookshelves with alternating verticals "bookworm" style. We must design and build a four-foot section of the exterior wall as a model.
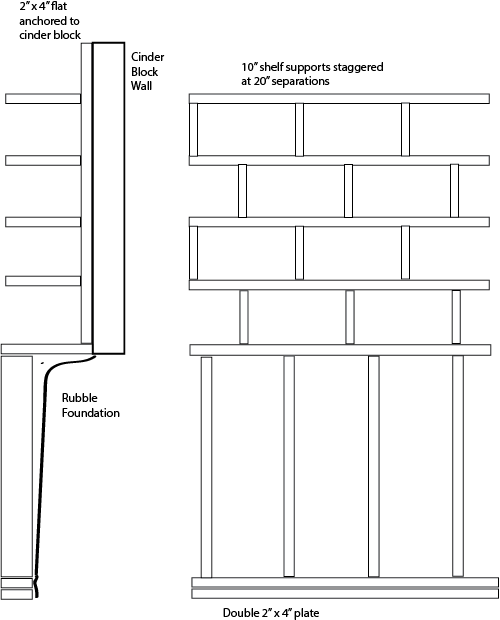
The lower plate will be 5/4" x 4" PVC. Upper plate will be pressure-treated 2" x 4".
-
We rejected sprayed foam insulation as well as batts of fiberglass or Ownes-Corning Foamular panels. Instead we used blown-in cellulose insulation between all the framing, exterior and interior walls. McLaughlin Insulation did an excellent job
-
Electric outlets in partitions on all four walls of each room. In the kitchenette we need multiple 20A outlets with GFCI.
-
Small air conditioners in offices - these can be portable air conditioners with a 5-inch duct pipe. We will cut the 5-inch hole in the cement blocks with our core bit. We can mount the air conditioner on a shelf and run condensate pipe outside through a 1/2 inch hole.
-
Radiator pipes (PEX-A) in partitions and possible looped through joists as radiant heating.
-
Offices include the two entrance stairs/doors for emergency egress.
-
New vinyl sheet flooring glued down with Henry 650R Releasable Bond Pressure Sensitive Adhesive in basement, perhaps different designs in different rooms?
-
We need some leveling material to flatten the floor in the workshop.
Front Stair Design
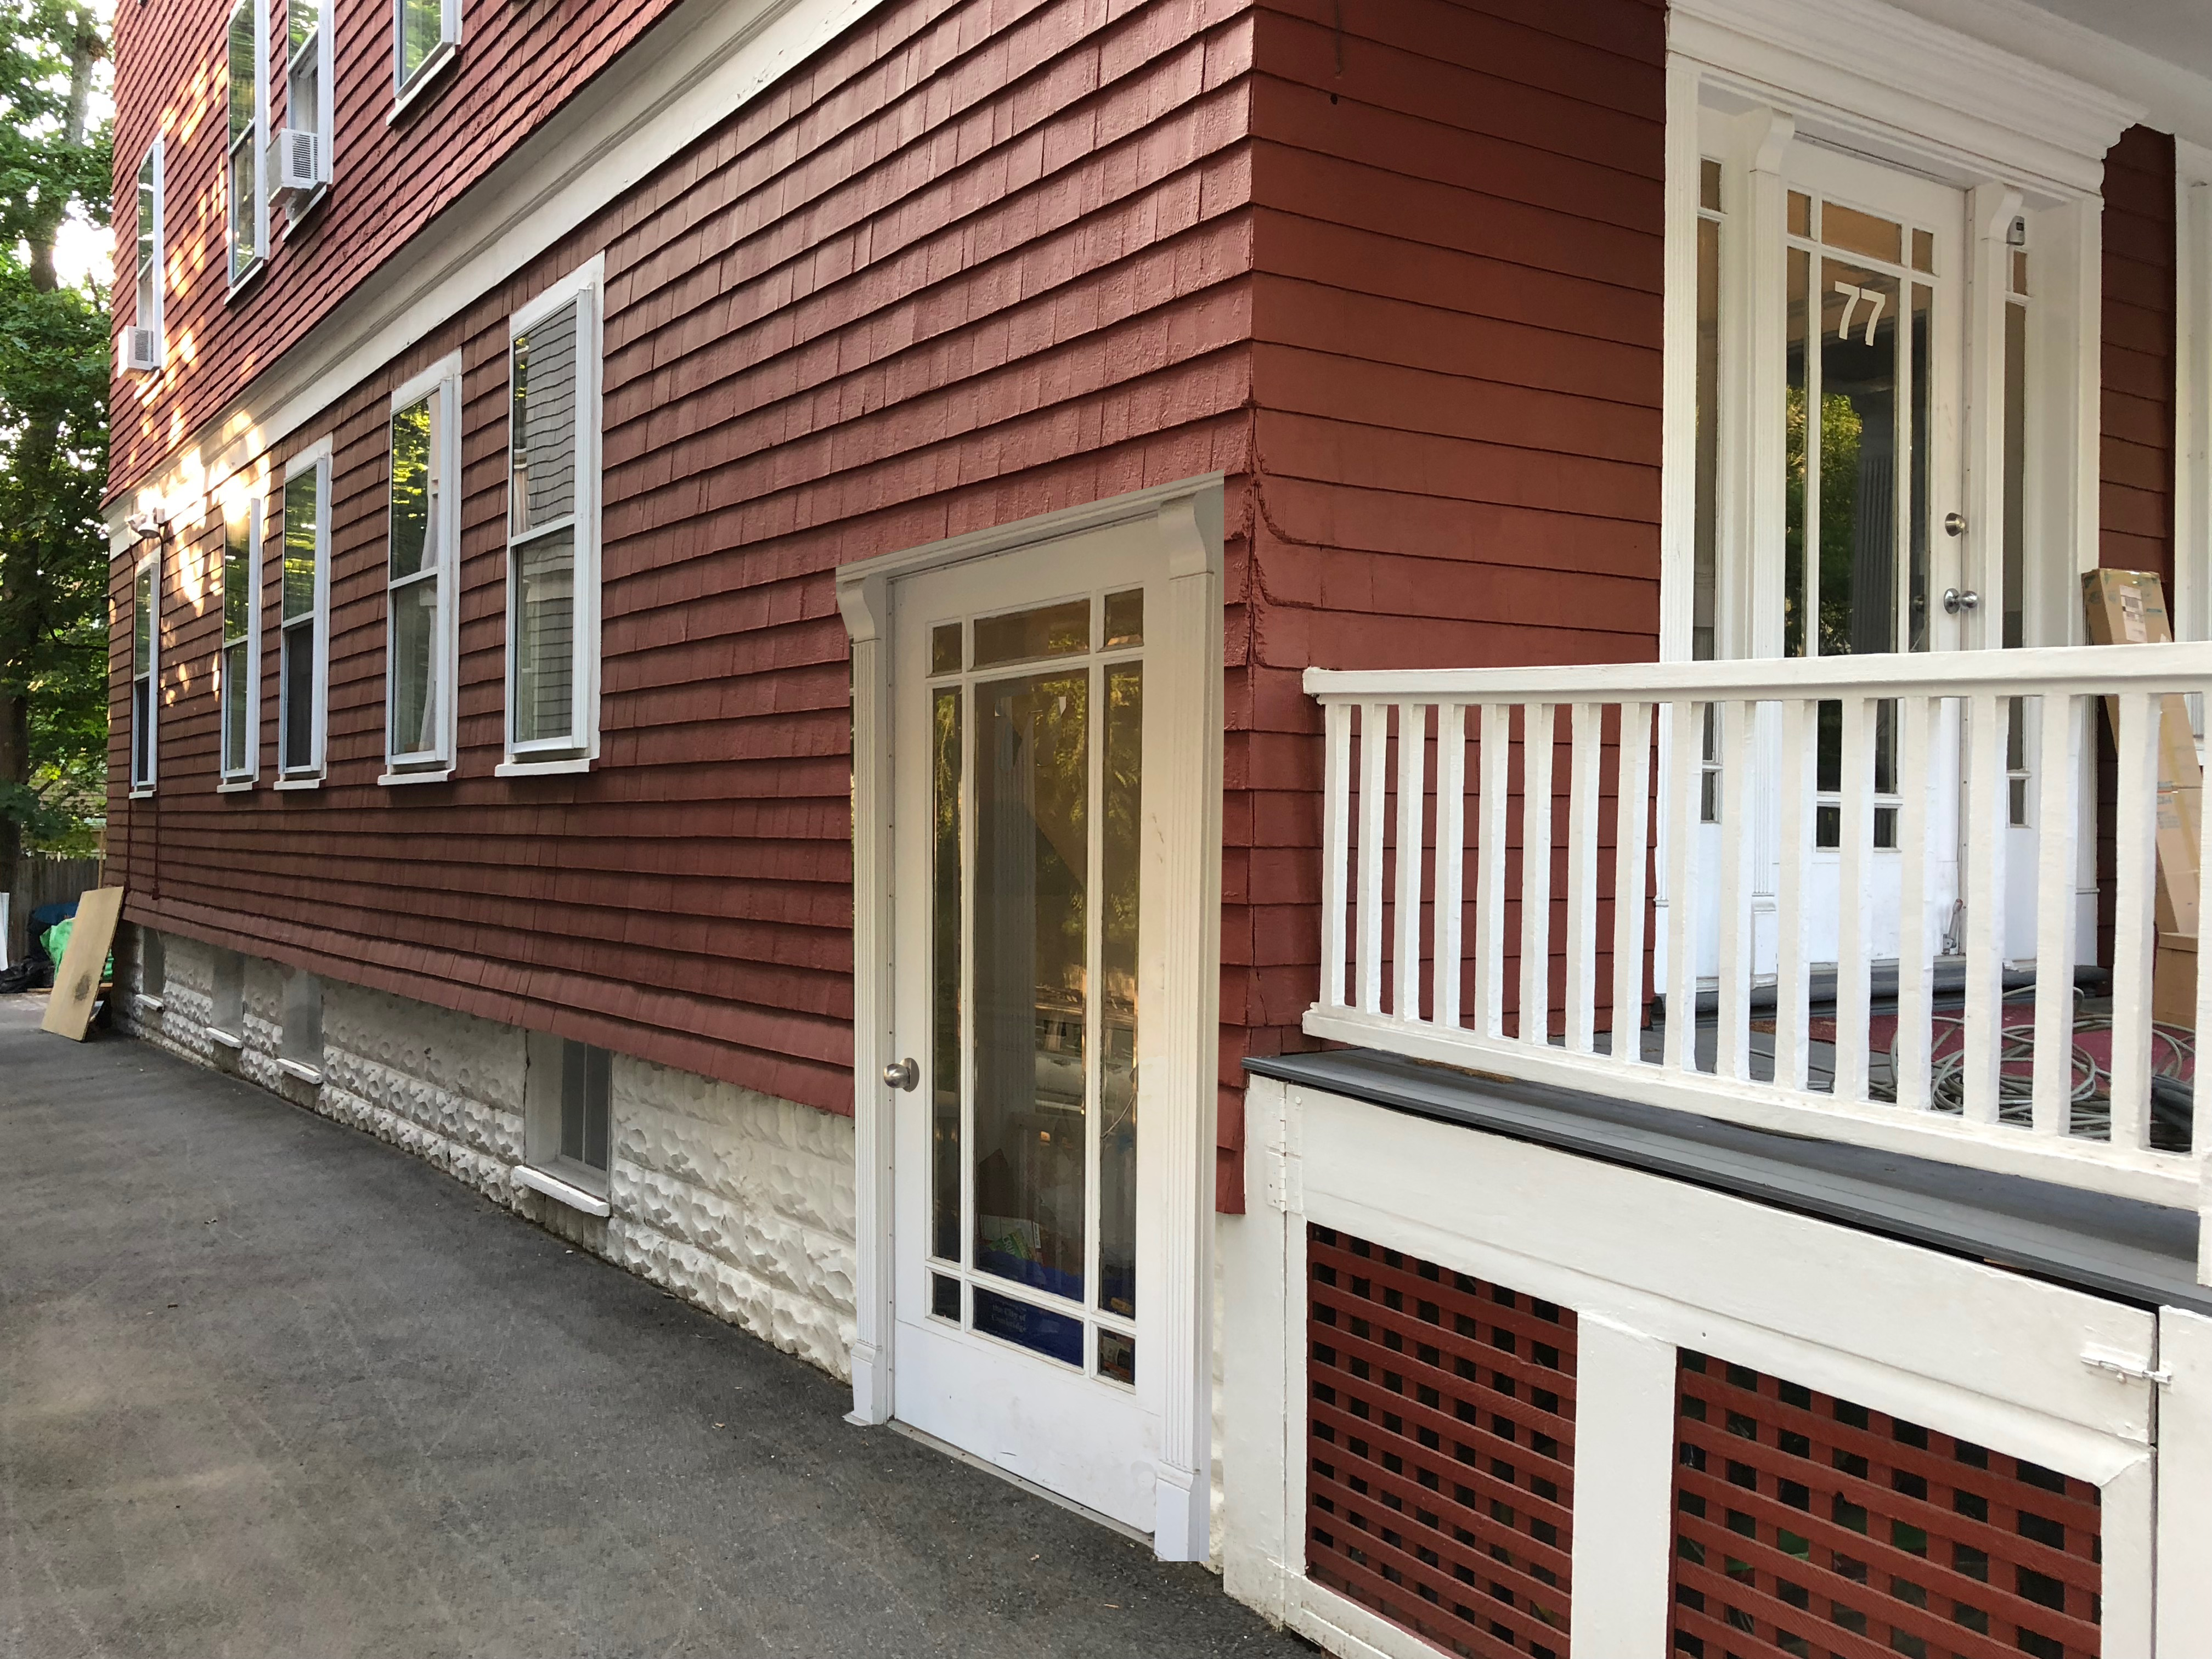 Visualization of new side entrance, 32" x 78" much like our current front door.
The door should open out.
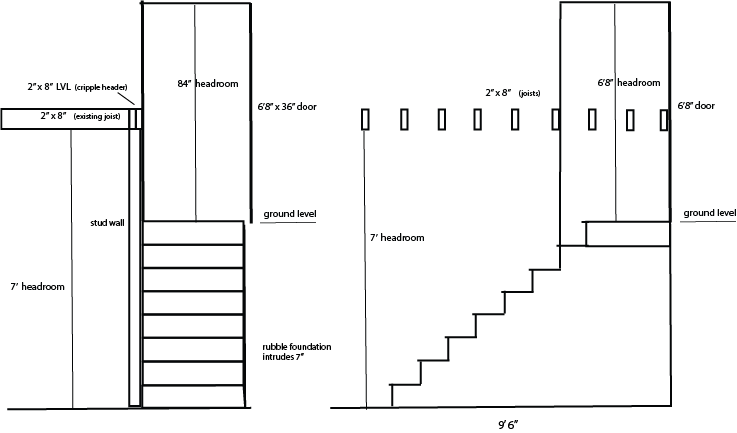
Because its 3.5-foot by 3.5-foot landing is a few feet below the vestibule of the first floor, it has only eight stairs instead of 13 in the upper floor staircases.
Because the rubble foundation extends 7" inside the cement block wall, the stairs are only 30" wide where upper floors are 36".
The basement ceiling height is 7'3" at the new stair, compared to upper floors with nine feet, yet the headroom at the bottom step is within the code at 6' 8".
We inspected the space under the first flight of stairs above. It is completely open. The upper stairs are attached only to the walls.
We need something to block winter cold from rushing in to the basement. Perhaps no inner door, but a lightweight folding door that could be out of the way except for the coldest weeks?
With cold blocked at the top of the stair, we could have a banister and newell post, bringing the staircase space into the room.
Visualization of new side entrance, 32" x 78" much like our current front door.
The door should open out.
Because its 3.5-foot by 3.5-foot landing is a few feet below the vestibule of the first floor, it has only eight stairs instead of 13 in the upper floor staircases.
Because the rubble foundation extends 7" inside the cement block wall, the stairs are only 30" wide where upper floors are 36".
The basement ceiling height is 7'3" at the new stair, compared to upper floors with nine feet, yet the headroom at the bottom step is within the code at 6' 8".
We inspected the space under the first flight of stairs above. It is completely open. The upper stairs are attached only to the walls.
We need something to block winter cold from rushing in to the basement. Perhaps no inner door, but a lightweight folding door that could be out of the way except for the coldest weeks?
With cold blocked at the top of the stair, we could have a banister and newell post, bringing the staircase space into the room.

Renovate Basement Bathroom
Enlarge bathroom from 7' x 3.5' to 7' x 6'.
We excavated the bathroom floor to provide a P-trap for a new shower drain and new piping for all fixtures, for a sink in the workshop, and for the kitchenette sink.
Fixtures.
Passageway to/from the Garage
We need a second safe egress from the main garage where we work on our family cars.
When we lose power, it is not possible to lift the heavy overhead door, and in event of fire we would like a second exit.
We propose to replace a 36" x 36" window in the garage with a full-height door. The garage window is 6.5 feet away from and directly opposite a 36" x 24" basement window. We would replace the basement window with a 32"-wide, six-foot-tall door. Both doors need to be steel frames because they are below grade.
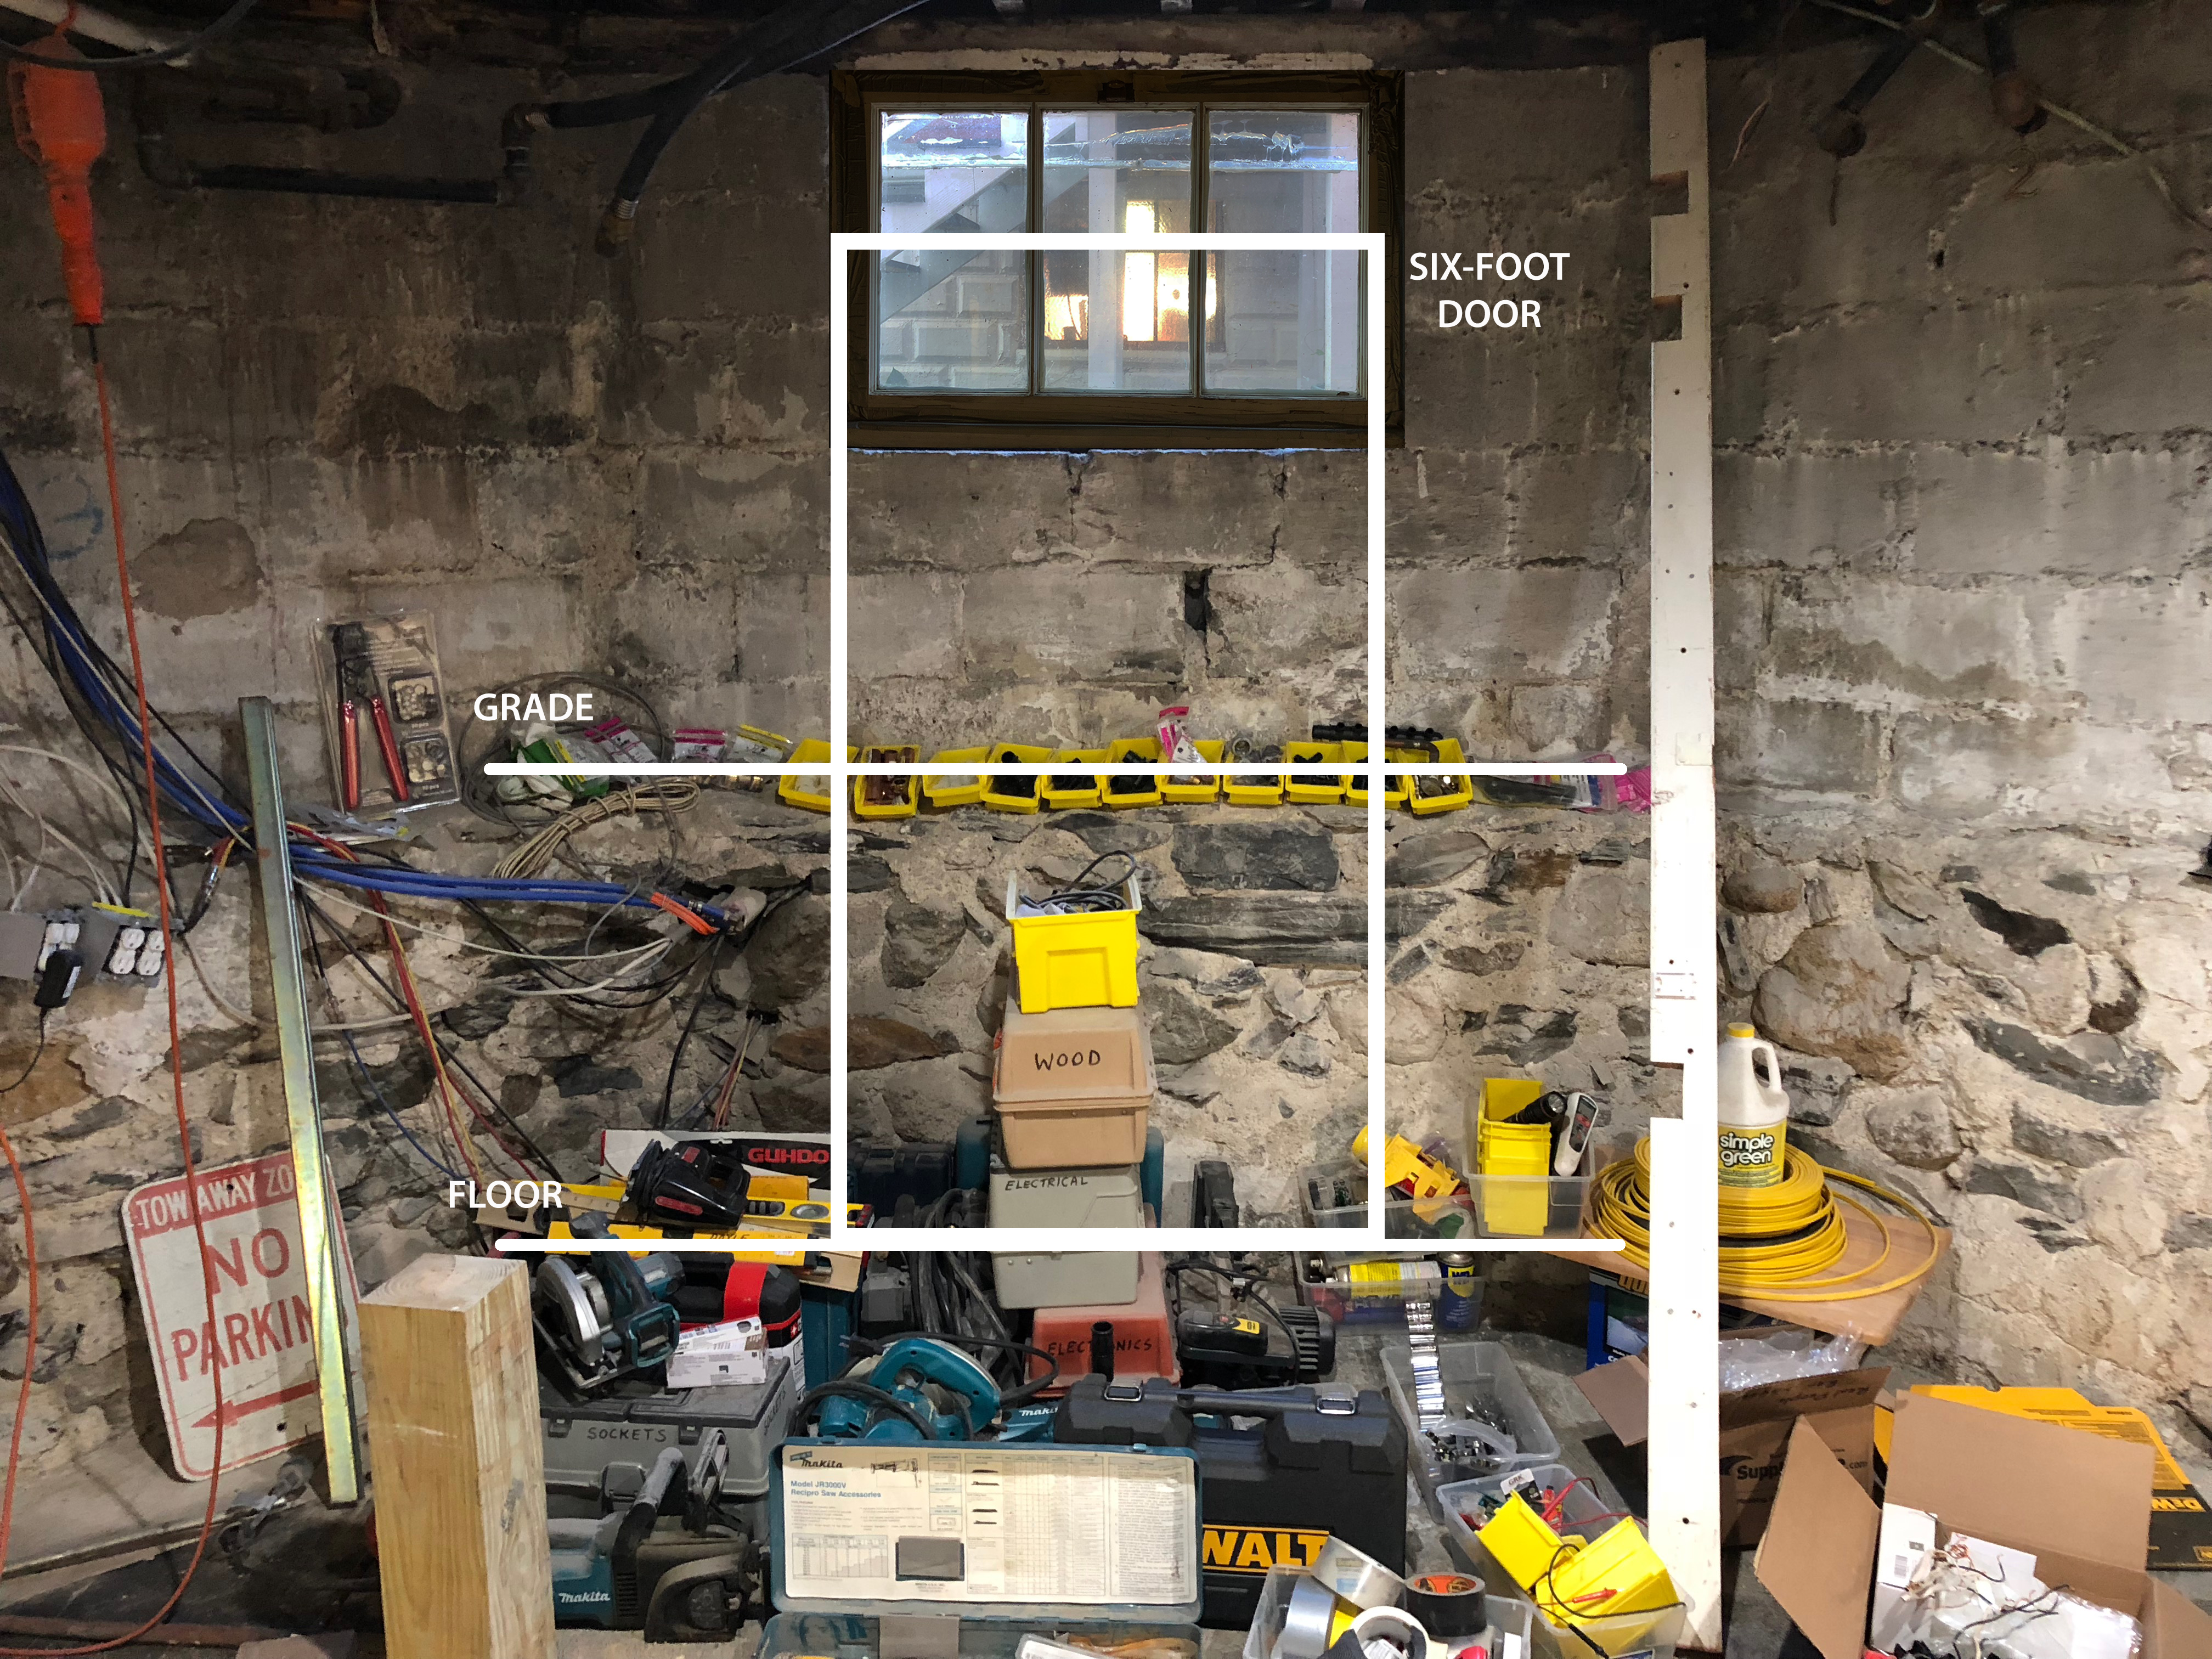 Looking through the basement window, you can see the garage window and part of the stair to the garage roof.
We would replace the current stair with a deck going up six steps, from which four more steps would reach the garage roof. We propose the roof be considered as open space.
Looking through the basement window, you can see the garage window and part of the stair to the garage roof.
We would replace the current stair with a deck going up six steps, from which four more steps would reach the garage roof. We propose the roof be considered as open space.
Wall Insulation
Mass Save provided a contractor to fill the exterior walls with packed cellulose insulation. It was economical ($1000 rather than perhaps $8000) but the installer cut shingles in half to drill holes and many shingles are falling out.
Solar panels on roof of 77 Huron and possibly 75 Huron
We may need to strengthen the structure of the 77 Huron roof to support an array of solar panels.
The current EPDM rubber roof is past its expected life. We have maintained it by resealing the seams and adding a one-foot strip of new rubber on top of the original seams.
We need to open the roof to properly insulate the space below, and install a ventilation fan. We thought we might put anchors in the roof joists/rafters for the solar panel racks. We would need to seal those anchor posts with new PVC welded to new white PVC roofing.
Alternatively, we can mount panel supports directly through the new PVC.
See our solar webpage for details
Open space on roof of 73 Huron
We have been encouraged to declare the roof of the six garages at 73 Huron to be considered "open space" by the city, perhaps even a "green roof?"
Building Permit Application
A homeowner building permit was filed online 8/24/2018, with the following stipulations;
Fire Protection: You must comply with NFPA 241 - Standard for Safeguarding Construction, Alteration, and Demolition Operations.
Guarantee Fund: Notice is hereby given that owners obtaining their own permit or dealing with unregistered contractors for applicable home improvement work do not have access to the arbitration program or guarantee fund under MGL c.142A.
Noise Ordinance: The undersigned as the Architect / Construction Supervisor / Owner for this proposed construction do hereby certify awareness and knowledge of Chapter 8.16 of the Cambridge Municipal Code regarding noise control. Necessary actions must be taken concerning the design, specification of an location of noise producing equipment; e.g., air condensers, heating equipment exhausts, etc., to insure that this project will not result in noise levels that exceed that allowed by the Municipal Code.
Demolition: For substantial demolition of any structural elements of more than 25% of existing building, detailed information of demolition must be included on construction drawings (proof of extermination required if excavating or demolition). Demolition of more than 25% of the existing area or volume of the structure requires a Demolition Permit.
Construction Debris: As a result of the provisions of MGL c 40 §54, I acknowledged that as a condition of the Building Permit, all debris resulting from the construction activity governed by this Building Permit shall be disposed of in a properly licensed waste disposal facility, as defined by MGL c 111 §150A.
Structural Peer Review: Required for high rise construction or buildings of unusual complexity as determined by the BBRS
Lead Safe Renovation Contractor License: This license is required and issued by the Massachusetts Department of Labor Standards (454 CMR 22.03(3)). This license is required for ALL renovation work on residential buildings constructed before 1978. The DLS licensed lead supervisor is required to be on-site at all times during the lead-disturbance phase of the project
Asbestos and Other Hazardous Materials: The undersigned as the Architect / Construction Supervisor / Owner for this proposed project do hereby certify that awareness and knowledge of contaminants in the building or on the site will require necessary action for remediation of hazardous materials by a contractor licensed for hazardous waste remediation. All debris resulting from remediation will be disposed of in a properly licensed hazardous waste disposal facility.
The undersigned hereby certifies that he/she has read and examined this application and that the proposed work subject to the provisions of the Massachusetts State Building Code and other applicable laws and ordinances is accurately represented in the statements made in this application and that the work shall be carried out in accordance with the foregoing statements and in compliance with the provisions of law and ordinance in force on the date of this application to the best of his/her ability.
The undersigned, by printing his/her name below, hereby certifies under the pains and penalties of perjury that the information herein, and all forms and supporting documentation submitted in support of the application(s), are true and accurate.
Cambridge Zoning Standards and 77 Huron Avenue
Our property is non-conforming with multiple zoning standards from this
ZONING ORDINANCE - CITY OF CAMBRIDGE
ARTICLE 5.000 DEVELOPMENT STANDARDS,
5.31 Residential Districts
|
District
|
1. Max. Ratio of Floor Area to Lot Area (FAR)
|
2. Min. Lot Size
|
Min. Lot Area for each D.U. in Sq. Ft.
|
Min. Lot Width in Feet
|
Minimum Yard in Feet
|
Front
|
Side
|
Rear
|
|
Max. Height in Feet
|
Min. Ratio of Private Op. Sp. to Lot Area
|
|
Res. B
|
0.5
|
5,000
|
2,500
|
50
|
|
35
|
40%
|
|
77 Huron
|
1.16
|
3745
|
3745/3 = 1248
|
40
|
|
35
|
53%
|
Excerpt from Cambridge Property Database for 77 Huron Avenue
Property Value
| Year of Assessment | 2018 |
|---|
| Tax District | R6 |
|---|
| Residential Exemption | Yes |
|---|
| Building Value | $799,800 |
|---|
| Land Value | $845,300 |
|---|
| Assessed Value | $1,645,100 |
|---|
| Sale Price | $42,500 |
|---|
| Book/Page | 12493/ 731 |
|---|
| Sale Date | August 3, 1973 |
|---|
| Previous Assessed Value | $1,604,400 |
|---|
Owner Information
| Owner(s) | DOYLE, ROBERT D. &
HOLLY THOMIS DOYLE
77 HURON AVE
CAMBRIDGE, MA 02138-6798 |
|---|
Building Information
Residential Building Number 1, Section 1
Exterior
| Style | DECKER |
|---|
| Occupancy |
THREE-FM-RES |
| Number of Stories | 3 |
|---|
| Exterior Wall Type |
Wood Shingle |
| Roof Type |
Flat |
| Roof Material |
Rubber Membrane |
Interior
| Living Area (sq. ft.) | 4,362 |
|---|
| Number of Units |
3 |
| Total Rooms |
18 |
| Bedrooms |
9 |
| Kitchens |
3 |
| Full Baths |
3 |
| Half Baths |
1 |
| Fireplaces |
0 |
Systems
| Heat Type | Steam |
|---|
| Heat Fuel |
Gas |
| Central A/C |
No |
Condition & Grade
| Year Built | 1916 |
|---|
| Interior Condition |
Average |
| Overall Condition | Average |
|---|
| Overall Grade | Good |
|---|
Parking
| Open Parking | 2 |
|---|
| Covered Parking | 0 |
|---|
Subareas
| Code |
Description |
Gross Area |
Living Area |
| FOP |
Porch, Open |
651 |
0 |
| FUS |
Upper Story, Finished |
2,908 |
2,908 |
| BAS |
First Floor |
1,454 |
1,454 |
| FBM |
Basement, Finished |
700 |
0 |
| UBM |
Basement |
754 |
0 |
| Total: |
6,467 |
4,362 |
Ceiling Height - Code of Massachusetts Regulations
CMR: STATE BOARD OF BUILDING REGULATIONS AND STANDARDS
780 CMR 5305 CEILING HEIGHT 5305.1 Minimum Height. Habitable rooms, hallways, corridors, bathrooms, toilet rooms, laundry rooms and basements shall have a ceiling height of not less than seven feet (2134 mm). The required height shall be measured from the finish floor to the lowest projection from the ceiling.
Exceptions:
1. Beams and girders spaced not less than four feet (1219 mm) on center may project not more than six inches (152 mm) below the required ceiling height.
2. Ceilings in basements without habitable spaces may project to within six feet, eight inches (2032 mm) of the finished floor; and beams, girders, ducts or other obstructions may project to within six feet, four inches (1931 mm) of the finished floor.
3. Not more than 50% of the required floor area of a room or space is permitted to have a sloped ceiling less than seven feet (2134 mm) in height with no portion of the required floor area less than five feet (1524 mm) in height.
4. Bathrooms shall have a minimum ceiling height of six feet eight inches (2036 mm) over the fixture and at the front clearance area for fixtures. A shower or tub equipped with a showerhead shall have a minimum ceiling height of six feet eight inches (2036 mm) above a minimum area 30 inches (762 mm) by 30 inches (762 mm) at the showerhead.
5. Ceiling heights in habitable basements, including drop ceilings, shall be a minimum of six feet eight inches (2032 mm).
References
This Old House
Stair Construction